Brisbane & South East Queensland
Comms rack installation Brisbane — built for the day it is full
A comms rack installation is the part of a cabling job somebody stands in front of at seven on a Monday with a torch. Sized in RU, ports in order, labelled at both ends, earthed properly, room left to grow.
ACMA registered cabler no. 42489 Built to AS/CA S009:2020 Port schedule handed over
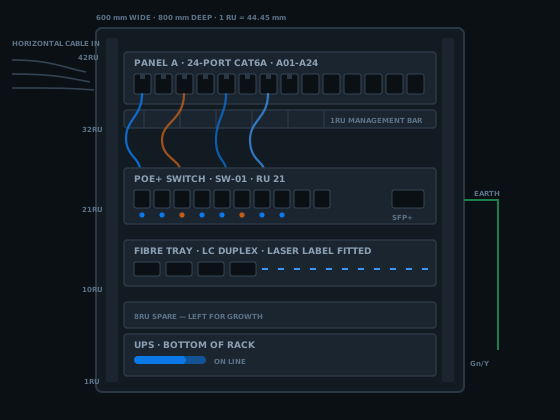
Every rack tells you what the last person was thinking. Ports running in the order the floor was cabled — or a bird's nest with four generations of patch lead in it and a label reading "OFFICE 2?" in biro. The gap between those two racks is a day of labour and a decade of somebody else's time.
This is the long version of a comms rack installation: rack unit maths, wall-mount against floor-standing, panel layout, cable management, labelling, the earth, the power, the heat, and the distance rule that decides where the room can live. It is the rack half of structured data cabling in Brisbane, under the network cabling overview on the homepage.
What a comms rack installation covers
The rack is where every cable in the building ends up. Get it wrong and the cabling still works — you just cannot use it without swearing. A comms rack installation done properly stays workable for somebody who has never seen the site.
The frame
Wall cabinet, hinged frame or floor enclosure, chosen on RU count, depth and floor space.
Patch panels
One panel per group of outlets, numbered to the floor, management bar under each.
Cable entry
Where the horizontal cable arrives, how it is supported, and how it turns into the panel without crushing.
Earthing
Frame, tray and screened cabling treated to the Wiring Rules, not to habit.
Power and UPS
Dedicated outlets, UPS at the bottom, headroom for the switch added later.
Labels and records
Printed labels both ends, a port schedule in the rack, test results and the compliance statement.
Some jobs are a comms rack installation from a bare wall. Plenty are a rescue — the cable is fine, the rack is a mess, and the fix is re-termination, management and labelling.
Rack sizing in RU, and why the rack always ends up too small
A rack unit is 44.45 mm — 1.75 inches — of mounting height on a 19 inch frame, rails 465.1 mm apart under the EIA-310 standard. Every piece of gear is described in multiples of it, so sizing a comms rack installation is arithmetic. People count the wrong things.
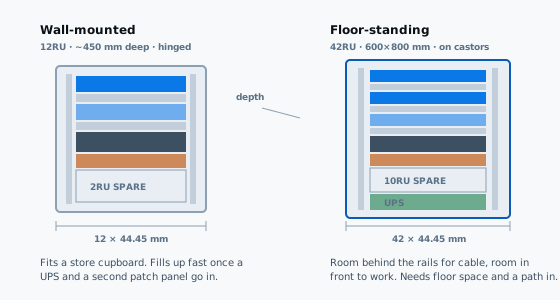
A 24-port patch panel is 1RU. A switch is 1RU. So 6RU sounds generous. Now add the management bar under the panel, a second panel when the tenancy takes the next suite, a fibre tray, a shelf for the NBN hardware, a UPS and a blank so the switch is not sitting on it. The 6RU is gone and you are hanging a second cabinet.
The rule I use on every comms rack installation: add up the hardware, add a 1RU management bar under each patch panel, then leave a third of the rack empty. Spare RU costs almost nothing at purchase and is the cheapest decision in the job.
Depth catches people as often as height. An RU number says nothing about whether a deep switch with cable turning behind it lets the door close. A shallow wall cabinet takes a patch panel and little else, so a recorder or server gets discussed before the frame is ordered.
Last trap: top and bottom RU are the hardest to work in — ankle height behind a UPS, or a ladder. Treat the middle third as prime real estate and put the panels there, because that is where hands go a hundred times a year.
Wall-mount or floor-standing — picking the frame
The first decision on a comms rack installation, and it turns on what else is going in the rack rather than on how many outlets you have.
Wall-mounted cabinet
Fine for one patch panel, a switch and a modem in a store cupboard. Keeps the floor clear. Has a bracket load limit and very little room behind the rails for cable to turn.
Hinged wall frame
Swings out so you can reach the back — excellent in a tight cupboard. The hinge is the weak point, so keep the UPS and anything heavy off it.
Floor-standing enclosure
The default once there is a UPS, a camera recorder or more than two panels. Room behind the rails, room in front, castors. Needs floor space and a path wide enough to get it in.
Open frame
Two posts or four, no doors. Cheapest per RU and easiest to work in. Useless where the public can reach it or dust is a problem.
A Brisbane note: plenty of small-tenancy comms cupboards are joinery, not construction, and the shelf inside was built for a modem. Check the wall before a comms rack installation goes on it — plasterboard with one stud behind it will not hold a loaded 12RU cabinet. A plywood backing board screwed to two studs fixes it in ten minutes.
The layout decision
Patch panel layout and the order the ports run in
A patch panel is a row of sockets. What makes it useful is numbering that means something. The convention that works on every comms rack installation is dull: panels get a letter, ports get a number, and the numbers follow the floor in a direction you can describe in one sentence.
Panel A is the front half of the office, clockwise from reception, A-01 to A-24. Panel B is the warehouse and the rear. Anyone at the rack finds the reception desk without a plan.
Group by area, not by device
Cameras, access points and desks move over ten years. Walls do not. Number by where the outlet is and the panel stays true after the furniture changes.
Leave gaps deliberately
Twenty outlets go on a 24-port panel with A-21 to A-24 free, not onto a second panel. Terminated spares beat empty ports while the ceiling is open.
Cross-connections matter too. Clause 12.2 of AS/CA S009:2020 says jumpers and patch cords should match or exceed the class of the installed cabling — the polite way of saying a bag of old Cat5e leads will quietly undo a Cat6A comms rack installation.
Cable management is an economic argument, not a vanity one
People assume a tidy rack is about pride. It is about the cost of the next fault, and on a comms rack installation that cost lands on the client rather than on me.
A labelled, dressed rack lets someone find a dead port, trace it and swap the lead in ten minutes. The same fault in a bird's nest means tracing by hand, unplugging things to learn what they were, and often dropping a working service. Published rates for comparable Brisbane work sit around $185 per hour standard time. Half a day of that, a few times a decade, outruns the management cost on the original job.
Leads cut to length
A 3 m lead doing a 300 mm job is where the mess starts. Length-matched leads keep the panel face readable.
Bend radius kept honest
Cat6A dislikes tight turns most. A crushed bend behind a panel reads as a marginal link, not a dead one, which is worse.
Velcro, not cable ties
A tie pulled hard deforms the pairs inside the sheath. Hook-and-loop lets the next person add a cable without cutting.
The horizontal management bar under each panel is the thing worth spending on in a comms rack installation. It is 1RU, it costs very little, and it decides whether leads drop in a curtain or cross the panel face hiding the port numbers you just printed.
Labelling conventions — the same identifier at both ends
Labelling is not decoration on a comms rack installation. Section 12.3 of AS/CA S009:2020 requires the cabling provider to supply enough information for cables and cross-connections to be correctly identified and connected, and requires those records to be legible and updateable. Pencil on masking tape fails both.
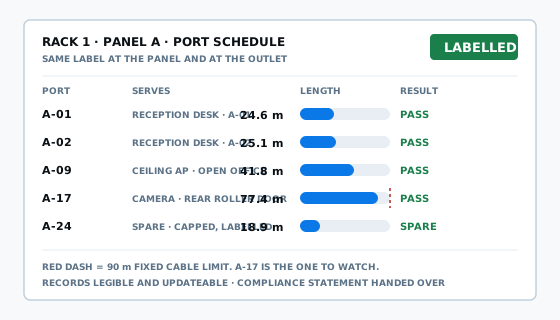
The convention is simple. Whatever a port is called at the panel, it is called that at the outlet — A-12 on the panel, A-12 on the wall plate, A-12 on the schedule. Both ends printed. Where the run feeds a ceiling access point, the label goes on the cable at the ceiling end, because there is no plate to write on.
For an MDF the standard is prescriptive. Clause 13.12 requires vertical columns of jumperable terminations lettered left to right omitting I and O, terminations in each vertical numbered upward from 1. Skipping I and O is for the obvious reason: nobody tells them from 1 and 0 in a dim cupboard.
Fibre carries an extra labelling duty. Clause 11.1.5.1 says every optical fibre panel and enclosure must be labelled to warn that hazardous laser levels may be present, and clause 11.1.5.4 sets black markings on a yellow background. A fibre tray with no laser warning label is a straightforward miss.
Records are the other half. The schedule listing port against outlet against tested length lives in a pocket on the rack door. The Wiring Rules point to AS/NZS 3085.1 for recording installation details including distributor records. Keep the paper and a PDF.
Earthing and bonding in a comms rack installation
This is where the internet gives the worst comms rack installation advice, because most of it is American. The Australian requirements sit in section 20 of AS/CA S009:2020 and are more nuanced than "earth everything".
Clause 20.19.1 says a metallic cable tray, conduit, trunking system, distribution frame, backmount or enclosure may be earthed or unearthed, depending on operational requirements. There is no blanket duty to bond a rack. What the standard controls is how you do it — clause 20.19.4 sets a minimum 2.5 mm² conductor with green/yellow insulation, and clause 20.19.3 sends that connection to protective earth.
Clause 20.19.2 is the one people trip on. A metallic frame, tray or enclosure must not be connected to a telecommunications reference conductor except at one permitted point. Bonding a rack to the wrong reference is a defect, not a tidy-up.
Outdoor cabling changes it
Clause 20.20 requires an earthing bar at a distributor terminating outdoor customer cabling with conductive elements where no surge suppression is fitted — green/yellow, 6 mm² minimum. Carpark camera cable lands squarely in this.
The switchboard is not mine
Only a licensed electrical worker may make a connection inside the electrical switchboard. Where a bond has to land there, that is an electrician's connection, coordinated rather than improvised.
Separation is the companion rule on any comms rack installation. Customer cable conductors and terminations stay 150 mm from uninsulated or single-insulated LV power conductors and terminations, or take a permanent, rigidly fixed barrier of durable insulating material or earthed metal. For general runs it is 50 mm, a barrier, or a stud between them. Full text is in the free copy of AS/CA S009:2020 from the Australian Telecommunications Alliance, and the duty to comply sits in section 23 of the Telecommunications (Cabling Provider) Rules 2025.
Power, UPS and what the rack actually draws
A rack needs power planned for it, not an extension lead from the nearest office outlet. Dedicated general power outlets in the comms room, sited so the UPS reaches them without a lead crossing the front of the rack.
Cabling and electrical work are separate trades under separate law. Queensland does not require an electrical licence for telecommunications cabling — section 55(3) of the Electrical Safety Act 2002 (Qld) — and the reverse holds: the outlets feeding the rack are an electrician's work, coordinated so they exist before the frame arrives.
UPS goes at the bottom
Batteries are the heaviest thing in the rack and a top-heavy frame on castors is a real hazard. Bottom RU, and check the load rating rather than assuming.
Size for the PoE budget
A switch feeding a dozen cameras and access points draws far more than the switch alone. Work out the PoE load you will use, then size power and runtime on it.
One habit worth keeping on a comms rack installation: label the power the way you label the data. Which outlet feeds the UPS, what the UPS feeds, what is on raw mains. When something trips at midnight, the person on site is not you.
Heat and ventilation when the rack lives in a cupboard
Most Brisbane small-business racks do not live in a comms room. They live in a store cupboard, under a stair, or in joinery behind reception. Workable — and where most comms rack installation heat problems come from.
The physics is simple: near enough to every watt the gear draws comes back out as heat. A PoE switch pushing power to cameras and access points is a heater with ports. Seal that in a cupboard through a Brisbane summer and the switch throttles or reboots, and the fault presents as a network problem rather than a temperature one.
What actually fixes it: vents low and high so air moves through, or a louvred door. Passive airflow does most of the work. A fan kit in the cabinet roof helps once the hot air has somewhere to go — a fan in a sealed cupboard just stirs it around.
The location rules agree. S009 requires an MDF inside a building to be free from ingress of dust and moisture and not subject to damp or humid conditions, and clause 13.9 requires adequate lighting, with 500 lux at a metre above floor level treated as adequate.
Access is the other cost. Clause 13.6.3 requires frontal clearance of not less than 1000 mm from a fixed electrical switchboard or meter panel, or 600 mm from the swing arc of a door. If the rack goes where the door cannot open, the comms rack installation was wrong before the first cable was pulled.
Where the comms room can physically go
Comms room location is not a preference. It is set by copper distance, and it shapes every commercial comms rack installation I quote.

Ninety metres of fixed cable plus up to ten metres of patch leads across both ends gives the hundred metre channel. That is the hard stop for copper. The catch is the ninety metres is cable pulled, not distance across a floor plan. Up the wall, along the tray, around a beam, down a stud — a 55 m straight line is regularly 80 m of cable. That one fact reshapes more comms rack installation quotes than anything else on this page.
So the rack goes as near the centre of the served area as the building allows. In a long warehouse that often puts it nowhere near the office, which people find odd until you walk the far corner with a measuring wheel. When that corner will not make it, the answer is a small second cabinet with a fibre link back to the main rack.
The room also wants to be near the switchboard. S009 recommends locating an MDF near the main or first electrical switchboard so surge suppression can be bonded within the conductor length limits — 1.5 m or less preferred, 10 m the outer limit. Centre of the floor versus near the switchboard is usually what the argument is about.
Prohibited locations are worth knowing before you plan the room. Clause 13.4 rules out a bathroom or toilet, a boiler, plant or machine room, corrosive fume areas, a fire escape stairway, a fire hose reel cupboard, a fire control room, below an electrical meter panel, and a sprinkler spray zone unless shielded. The hose reel cupboard catches people, because it is often the only spare cupboard on the floor.
What a comms rack installation costs and what moves the number
Nobody publishes rack pricing, because no two racks are the same job. What I can give you is the variables that move a comms rack installation quote, so you can read one.
Port and panel count
Termination time scales with ports. Twenty-four on one panel is quicker per port than eight across three sites.
Access and cable entry
A clear cupboard wall is one job. A live comms room with existing cable to work around is another, usually after hours.
New build or retrofit
Cabling into an open ceiling before the fitout is the cheap version. Everything after handover costs more.
Hourly work
Tidy-ups, re-terminations and fault finding are hourly. Published rates for comparable Brisbane work sit around $185 per hour standard time.
Registration belongs on the quote too. Cabling connecting to a telecommunications network — including the patch panel side of a comms rack installation — must be done by a registered cabling provider, or someone directly supervised at all times by one. A restricted registration does not authorise work terminating at an MDF or a patch panel, so ask which class you are getting; the classes are set out on the registered cabler page.
Three things to check on any rack quote: whether frame, panels and management hardware are itemised or lumped as "rack and accessories"; whether every link is tested and the results supplied; and whether labelling and a port schedule are included. That is where a cheap comms rack installation quote gets cheap.
Comms rack installation questions I get asked
How many RU should a comms rack installation allow for?
Add up the hardware, add a 1RU management bar under every patch panel, then leave a third of the rack empty. A 24-port panel and a switch is 2RU of gear and about 6RU of rack once management, a fibre tray and a UPS go in.
Is a wall-mounted comms rack or a floor-standing rack better for a small office?
Wall-mount suits one patch panel, one switch and no UPS, and keeps the floor clear. Anything with a second panel, a UPS or a camera recorder wants a floor-standing frame, because a hinged cabinet leaves almost no room behind the rails for cable to turn.
Does a comms rack have to be earthed in Australia?
Not automatically. Clause 20.19 of AS/CA S009:2020 says a metallic frame, tray, enclosure or backmount may be earthed or unearthed depending on operational requirements. If it is earthed, the conductor must be green and yellow and at least 2.5 mm squared, and it goes to protective earth.
How should patch panel ports and wall outlets be labelled in a comms room?
The same identifier at both ends, printed rather than handwritten, and recorded on a sheet that lives in the rack. Panel A port 12 reads A-12 on the panel and A-12 on the wall plate. Section 12.3 of the Wiring Rules wants records that are legible and updateable.
Can a comms rack go in a cupboard, or does it need a dedicated room?
A cupboard is fine for a small rack provided the heat has somewhere to go and the door opens fully. Near enough to every watt the switch and UPS draw comes back out as heat, so a sealed joinery cupboard cooks the gear. Vents low and high, or a louvred door.
How far can the comms room be from the furthest data outlet?
Ninety metres of fixed cable, plus up to ten metres of patch leads across both ends, for a hundred metre channel. That is cable pulled, not distance across the floor plan, and up the wall then along the tray burns it quickly. Past that you need a second rack.
Does a comms rack installation include the switch and the UPS?
It can, and it is often cleaner if it does, but plenty of clients supply their own active gear or have an IT provider who wants to. The cabling side is the rack, the panels, the management, the labelling, the earth and the tested links. Settle that early.
Why does cable management add cost to a comms rack installation?
Because it is time, not parts. Dressing leads to length, running them behind the rails, fitting management bars and keeping bend radius honest takes hours that a tangle does not. You buy it back the first time somebody traces a dead port at five on a Friday.
Can a comms rack installation fix an existing rack that was done badly?
Usually yes, and it is a common job. The cable is generally fine; the terminations, the labelling and the lead management are the problem. It gets done in stages so the site stays up, one panel at a time, with the old links live until the new ones prove out.
Where is a comms rack or MDF not allowed to go in a building?
Clause 13.4 of AS/CA S009:2020 rules out bathrooms and toilets, boiler, plant and machine rooms, areas with corrosive fumes, fire escape stairways, fire hose reel cupboards, fire control rooms, below an electrical meter panel, and any sprinkler spray zone unless it is shielded.
Get a comms rack installation quote
Tell me what the room is, how many outlets are landing in it, and whether anything is already on the wall. A photo of the cupboard answers more than a paragraph does, and it usually shapes a comms rack installation quote more than the outlet count.
Or just call 07 3521 8082. If it goes to voicemail I am behind a rack somewhere; leave a message and I will call back.
ACMA registered cabler no. 42489 All work to AS/CA S009:2020